Thursday, March 31, 2016

Puto (Steamed Rice Cake)

Colored Puto
Puto is a steamed rice cake in the Philippines.   It is served as a snack, dessert or as an accompaniment to another meal such as stews or noodle dish.  Puto is traditionally made with galapong (dough made from uncooked rice that was soaked overnight, drained and ground.)  The dough is mixed with coconut milk or milk and sugar and flavored with anise or lihiya (wood ash lye.)  The mix is then steamed producing a soft, moist cake with a uniform grain.  It is neither sticky nor dry and crumbly.
Puto with cheese topping
Traditionally it is steamed in putuhan, a large steamer with rings made of either soldered sheets of metal or thin strips of bent bamboo enclosing a flat bamboo. It has a large conical cover to allow the condensing steam to drip along the perimeter of the steaming tray and not on the cake.  Nowadays the ingredients for puto are so convenient and easy to find.  With rice flour and canned coconut milk, it's so easy to make!
Puto with salted egg topping
Puto comes in many shapes and forms.  It is traditionally prepared as a whole cake and not on individual molds.  It is then cut in individual serving portions before serving.  It has a greenish hue from the use of Pandan leaves and banana leaves that lined the steaming tray.  It is usually topped with grated coconut or native cheese or salted egg. Following are some of the variants of puto:
  • Puto bumbong - a popular Christmas delicacy in the Philippines;  made with deep purple sticky rice that is soaked in saltwater overnight then poured in individual bumbong (bamboo tube) and then steamed.  
  • Puto kutsinta - moist and chewy rice cake made with lye.  The color ranges from reddish brown, orange to yellow. 
  • Puto maya - a purple puto that is flavored with ginger.
  • Puto pao - puto with sweet meat filling
  • Puto lanson - a foamy puto made with grated cassava
I made puto for Easter so I added a little bit of color in the puto mixture. Some I left uncolored, some I added toppings of cheese and salted egg.  Instead of serving deviled eggs or colored eggs, I served colorful puto and it was a big hit for my kids! I used plastic sauce cups for molding the puto.  I have a tiny steaming tray so for every 10 minutes I can only steam six.
Puto

Prep Time: 60 minutes
Cooking Time: 80 minutes (10 minutes/batch)
Yield: 48 pieces (1 3/4-inch diameter)

Ingredients:
  • 2 cups rice flour, sifted
  • 2 cups all-purpose flour, sifted
  • 2 1/2 tablespoons baking powder
  • 1 1/2 cups sugar
  • 1 teaspoons salt
  • 14 ounces coconut milk (or 2 cups freshly squeezed coconut milk)
  • 2 cups fresh milk
  • 2 eggs (optional)
  • food colors (red, blue, green & yellow), optional
  • melted butter or vegetable oil for greasing the molds
  • optional toppings (bits of cheddar cheese or feta cheese, salted egg)
Procedure:

  1. Combine all dry ingredients (first five) in a large mixing bowl. Mix well.
  2. Combine milk, coconut milk and eggs in a separate bowl. Mix well.
  3. Pour the liquid mixture to the dry mixture.  Whisk together until smooth.  Cover bowl with cling wrap and chill the batter in the refrigerator for 45 minutes. 
  4. Grease the puto molds. (I used 48 plastic sauce cups.)
  5. If adding color to the puto: Divide the batter equally into 6 different bowls about 1 cup each. Leave the sixth cup uncolored so you have plain white batter. Follow the color guide below per 1 cup of batter:
  • pastel pink:  2 drops of red 
  • pastel orange: 1 drop of red + 1 drop of yellow
  • pastel yellow: 2 drops of yellow
  • pastel green: 2 drops of green
  • light purple: 1 drop of blue + 1 drop of red

6. Boil water in the pan for steaming. Pour about 1 tablespoon in each mold.

7. If using toppings: Place a bit of the topping of choice on top of the batter.

8. Steam each batch for 15-20 minutes while checking the steaming tray's lid from time to time for condensation. Make sure condensation doesn't drip on the cake.

9. Remove from the steaming tray. Cool for 5 minutes. Remove each puto from the mold and serve.


    Tuesday, March 29, 2016

    Lumpiang Shanghai (Fried Spring Rolls)


    Lumpiang Shanghai is the most popular Filipino appetizer.  This golden crispy tiny stick bursting in flavor,  in terms of popularity is way up there with pansit, lechon and adobo.  The dish was introduced by the Chinese traders to the pre-Hispanic Philippines.  Lumpiang Shanghai is different from Lumpiang Sariwa (Fresh Spring Roll.)  The former is fried and the latter is not.  See my recipe for Lumpiang Sariwa here.

    Fried lumpia is made with chopped vegetables such as carrots, cabbage, green beans and bean sprouts; and ground meat such as pork, beef, chicken or shrimp.  It is flavored with garlic and onion; seasoned with soy sauce, salt and pepper; and wrapped in a thin crepe pastry called lumpia wrapper.  The wrapper is made if rice flour.

    It is served as an appetizer or snack and usually comes with dipping sauce on the side.  The traditional sauce is the thick sweet and sour sauce made from a combination of water, vinegar and sugar.  Other dipping sauces include: salt and vinegar; garlic, salt and vinegar; soy-vinegar sauce with or without garlic; and chili-garlic vinegar to name a few.  It is commonly served as a finger food in every gathering and celebration.

    Lumpia is similar to Indonesia's loempia. Lumpia has been adopted not only by Southeast Asian countries like Vietnam and Malaysia but by European countries as well such as the Netherlands,  Belgium, France and Denmark.  In some Latin countries such as Venezuela lumpia was also introduced there by Chinese immigrants.

    People who have visited the Philippines would have a clear recollection of lumpia if they have tried them.  Filipinos, both adults and children love lumpia.  My lumpia recipe is a version I learned from my grandma.  It has minced shrimp.  The flavor of the shrimp adds depth to the otherwise bland version with just ground pork in it.

    Lumpiang Shanghai

    Prep Time:  45 minutes
    Cooking Time: 50 minutes
    Yield: 50 pieces

    Ingredients:

    Lumpia Sauce: *

    • 1 cup water
    • 3 tbsp. rice vinegar
    • 1 tbsp. banana catsup
    • pinch of salt
    • 1 tbsp. cornstarch dissolved in 2 tbsp. of cold water


    Lumpia Filling:
    • 1 lb. ground pork
    • 1/2 lb. large shrimp, peeled, deveined and finely chopped
    • 1 medium carrots,  minced
    • 1/4 cup Chinese celery, minced*
    • 1 small yellow onion, minced
    • 1/4 cup soy sauce
    • 1 large egg
    • 1/4 tsp. salt
    • 1/8 tsp. freshly ground pepper
    • 50 pcs. Lumpia / eggroll wrapper, separated and covered with damp cloth
    • 1-2 cups peanut oil for frying


    Garnish: sprig of parsley (optional)

    Procedure:

    Lumpia Sauce:


    1. Mix water, vinegar, catsup and salt in a saucepan.  Bring to a boil. Lower heat and simmer for 5 minutes.
    2. Add the cornstarch slurry to thicken sauce.  Simmer for 3 minutes while whisking. 
    3. Remove from heat and transfer to a bowl to cool.


    Lumpia:

    1. Mix all ingredients together:  In a large bowl mix all lumpia filling ingredients except for the wrapper and oil.*

    2. Fill the wrapper:  Lay one wrapper on a plate or clean work surface and spoon about a tablespoon of lumpia on it.
    3. Roll and seal the lumpia: Cover the filling by turning up the bottom corner of the wrapper.  Fold in the left and right corners as if making an envelope. Roll the lumpia snugly yo ensure there are no air pockets to about half an inch in diameter.  Seal the lumpia by dabbing the inside of the remaining corner with water or beaten egg.


    4. Repeat Step 3 until all wrappers are filled, rolled and sealed. (See Notes below for stoeage information.)
    5. Fry the lumpia:  Heat oil in a deep fryer or skillet to 350 degrees.  Fry the lumpia about 5 pieces per batch for 4-6 minutes until golden brown and the filling is fully cooked.  Remove from the pan.
    6. Drain excess oil by putting fried lumpia pieces in a strainer over paper towels. (Or just simply place them over paper towels.)
    7. Transfer to a plate and garnish with a sprig of prasley. Serve warm with sauce on the side.

    Notes:

    * Make the sauce first before starting to fry the lumpia.

    * If Chinese celery is not available,  substitute with the soft part of a regular celery.

    * The filling can be prepared a day ahead. Put in an airtight container and store in the refrigerator.

    * To check the flavor of the lumpia mixture: cook a teaspoon of the lumpia filling in a pan with hot oil over medium heat.  Taste and adjust salt and pepper.

    * To facilitate efficient filling and rolling of the lumpia, separate the wrappers before starting to fill and cover with damp cloth to prevent them from drying.

    * Uncooked lumpia can be stored in single layers in an airtight container in the refrigerator overnight or in the freezer for up to a month.

    * Frying frozen lumpia will take 2 minutes longer than frying freshly wrapped lumpia.

    * Fried lumpia does NOT store well. It gets soggy because of the wrapper.

    * Fried lumpia may be served with different dipping sauces, too apart from the standard lumpia dipping sauce.  These sauces include: salt and vinegar; garlic, salt and vinegar; soy-vinegar sauce with or without garlic; and chili-garlic vinegar to name a few.


    Buko Salad Samalamig (Young Coconut Salad Drink)

    Samalamig or Palamig is an iced beverage that contains coconut milk, buko or young coconut flesh, sago (tapioca pearls) and gulaman (agar jelly.)  It is usually sweetened with arnibal (sugar syrup) or condensed milk and flavored with different fruit exctracts.  The words palamig and samalamig is derived from the word "lamig" which means cold.  This cooler or refreshing drink is available almost in every street corner of Manila and other places in the Philippines.
    Buko Salad Samalamig or Palamig is a sweet drink or cooler with ingredients similar to the popular Filipino dessert Buko Salad except for the use of coconut water and coconut milk.  It is made with coconut water, coconut milk, tapioca pearls, gelatin, young coconut flesh, kaong or sugar palm fruit and nata de coco or sweetened fermented coconut water. Coconut has several names in the Philippines with each referring to a different meaning.  Buko refers to a young coconut while niyog refers to the mature coconut.   The flesh of the young coconut is used for making dessert salads and sweet drinks.  The tougher meat of the mature coconut is grated and extracted for its coconut cream or kakang gata.  Water is added to the grated coconut meat and extracted for its coconut milk or gata

    Buko Salad Samalamig

    Prep Time:  50 minutes
    Yield:  8 servings

    Ingredients:

    • 4 cups coconut water
    • 2 cups coconut milk
    • 12 oz. kaong
    • 12 oz. nata de coco
    • 2 cups young coconut flesh, shredded
    • 2 cups gelatin, red and/or green, diced in 1/2 inch cubes (Recipe here)
    • 12 oz. cooked sago or tapioca pearls (Recipe here)
    • 14 oz. sweetened condensed milk
    • ice cubes for serving

    Procedure:
    1. Combine all ingredients in a large pitcher. Stir well. 
    2. Chill in the refrigerator for 45 minutes.
    3. Serve chilled over ice in a glass.


    Sweetened Sago ( Sweet Tapioca Pearls)

    Sago is a starch extracted from the spongy pith of tropical palm stems.  It is also produced from the extracts of cassava root, hence the name tapioca.  It is commercially produced in the form of flour, starch and pearls.  Sago pearls can be boiled with water, milk or coconut milk.  It is a comon ingredient in desserts like halo-halo and ginataan and sweet drinks such as palamig in the Philippines.

    Sweetened Sago

    Prep Time: 5 minutes
    Cooking Time:  40 minutes
    Yield:  2 cups

    Ingredients:

    • 14 oz. uncooked sago or tapioca pearls
    • water for boiling the sago
    • 2 cups brown sugar for the syrup
    • 2 cups water for the syrup

    Procedure:

    1. Boil water in a pot.  Add sago pearls. Stir and continue to boil for 10 minutes. Remove from heat. Rinse and drain.
    2. Put sago back in the pot. Cover with enough cold water.  Bring to a gentle boil for 10 minutes.  Remove from heat. Rinse and drain.
    3. Repeat Step 2 twice or until sago pearls don't have the white at the center.
    4. Rinse cooked sago under cold running water twice more to remove excess starch.
    5. Use as needed or store in the refrigerator in an airtight jar with simple syrup.

    To make the simple syrup:
    1. Combine sugar and water in a saucepan over medium heat. Bring to a boil.
    2. Lower heat and simmer for 20 minutes.
    3. Pour over sago.


    Gulaman (Agar Jelly)


    Gulaman refers to dried (agarose or agar) seaweed bars in the Philippines used to make jellies, flans, desserts and drinks.  It is a common ingredient to sweet drinks like sago at gulaman, buko pandan and various desserts like fruit salad, halo-halo and gulaman dessert.

    Gulaman

    Prep Time: 50 minutes
    Cooking Time:  25 minutes
    Yield: 3 cups

    Ingredients:

    • 2 (5 g. each) bars red agar-agar, shredded
    • 3 cups water
    • 1 cup sugar

    Procedure:

    1. Soak agar-agar in a pot for 30 minutes. 
    2. Boil the soaked agar-agar stirring regularly until it is dissolved for about 10 minutes.
    3. Add sugar. Stir and simmer for 15 minutes.
    4. Remove from heat and pour into a flat dish or a medium-sized cookie sheet. Use a fine strainer while pouring.
    5. Cool in the refrigerator for 15 minutes or until the gelatin is set and has hardened.
    6. Cut into 1/2-inch cubes.

    Saturday, March 19, 2016

    Pork Sisig (Sour and Spicy Chopped Pork Belly, Ears and Liver)


    This week's regional specialty is from Pampanga, a province in Central Luzon (Region 3) in the Philippines. Central Luzon is considered as the "Rice Granary of the Philippines.   The region contains the largest plain in the country and produces most of the country's rice supply.  It is consisted of Aurora, Bataan, Bulacan, Nueva Ecija, Pampanga, Tarlac and Zambales.

    Sisig is a Kapampangan (a dialect in Pampanga, Philippines) term which means "to snack on something sour."  It usually refers to unripe fruits like mango, papaya and others that are served as snacks or appetizers.  The fruits are commonly dipped in salt and vinegar.  Sisig is also a preparation method for fish and meat in which it is marinated in vinegar or lemon juice with salt, pepper and other spices.  Sisig also refers to a dish made from parts of pig’s head and liver that is seasoned with calamansi (native lime), onion and chili peppers.  It is a popular appetizer and main entree or viand (an entree that goes with rice) in the Philippines. It also pairs well with beer and is considered to be the most popular appetizer in the country. 

    Today different versions of sisig includes sisig ala pizzailo, tuna, milkfish,  green mussels or tahong, mixed seafood, ostrich sisig, crocodile sisig, spicy python, frog sisig and tokwa't baboy, among others. 

    Here's my sisig recipe that is very close to Aling Lucing's.  Raw egg is a very good substitute to ox brains.

    The dish, sisig  was first concocted in 1974 in Angeles City Pampanga by a restaurant owner named Lucia Cunanan. The original recipe was consisted of boiled and chopped pig ears and cheeks seasoned with vinegar, calamansi juice, chopped onions and chicken liver and served in hot plates (sizzling plates.)

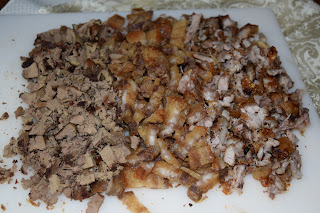
    Preparing sisig comes in three phases: boiling, broiling/grilling and frying.  A pig's head is first boiled to tenderize it then broiled or grilled to remove hair.  It is fried to give it a crusty or crunchy texture.  When hot plates are not available, all the chopped meat are quickly fried on the pan to warm it then coarsely chopped onions are added right before serving.  Traditionally ox brains are added to the mix in the third phase of cooking it as a binding agent.  Alternative ingredients such as raw egg, chopped grilled liver, chopped pork cracklings, and/or mayonnaise are added to it to add more moisture and thick consistency to the otherwise dry dish.  


    Pork Sisig

    Prep Time:  15 minutes

    Cooking Time: 90 minutes
    Yield:  8 servings

    Ingredients


    • 8 cups of water
    • 8 cloves of garlic, smashed
    • 1 knob of ginger, crushed
    • 4 pieces of bay leaves
    • 1/2 cup white vinegar
    • 1 tablespoon salt
    • 1 tablespoonn whole peppercorns
    • 1 pound pig ears
    • 1½  pounds pork belly
    • 1/2 pound chicken liver
    • 2 teaspoons red pepper flakes
    • 1/4 cup soy sauce
    • 1 teaspoon red pepper flakes
    • a pinch of salt and pepper
    • 1 large onion, coarsely chopped
    •  2 tablespoons green onions, chopped (optional)
    • 1 whole egg per serving, raw
    • 2 tablespoons mayonnaise per serving (if using)

    Garnish:
    • 1 piece lime or lemon (or 3 to 5 pieces calamansi)
    • 1 whole chilli pepper


    Procedure:

    1. Bring water to a boil in a stockpot over high heat. Add garlic, ginger, bay leaves, vinegar, salt and pepper.  
    2. Put the pig’s ears and pork belly in the boiling water and simmer for 1 hour or until tender.
    3. Remove the boiled ingredients from the pot and drain the excess water.
    4. Pan fry the boiled pork belly for 5 minutes on each side or until golden brown and crunchy.  
    5. Broil or grill the boiled pig ears for 10 minutes or until grill or broil marks are present.
    6. Broil or grill the chicken liver for 10 minutes or until well-done.
    7. Chop the pig ears, pork belly and liver into fine pieces.
    8. Combine all the chopped meat and liver. Mix in soy sauce and pepper flakes. Season with salt and pepper.
    9. Stir fry the chopped meat and liver for 5 minutes.  (Skip this step if using a hot sizzling plate.)
    10. Put the mix in a hot (sizzling) plate or a serving platter.
    11. Top with onions, green onions and raw egg or mayonnaise.
      Toppings and farnishings for the sisis
    12. Garnish with, chilli pepper and a slice of lemon or lime.
    13. Serve hot.


    Notes:


    * Liver is a critical ingredient in sisig.  You can omit the pig's ears but not the liver because it adds a different flavor to the dish.

    *  If you are uncomfortable consuming raw egg, substitute it with mayonnaise.  Ox brains and raw eggs are used in the dish to add moisture to it.
    *  Do not chop the chilli peppers for garnishing as the seeds will make the dish extremely spicy.  You can deseed it and then chop it instead.

    Saturday, March 12, 2016

    St. Patrick's Day Brunch - Filipino Style

    Clockwise from left to right: Buko Pandan Drink, Sinangag (Garlic Fried Rice), Sapin-Sapin Rice Cake, Pandesal, Corned Beef Hash and Embutido

    Good day!  We are counting down to St. Patrick's Day on March 17.  St. Patrick, the patron saint of Ireland, has a widely-celebrated feast day in the United States.  Nearly 35 million Americans - almost 11% of the population -  report Irish ancestry.  Even President Barack Obama had some maternal ancestors come to America from the small village of Moneygall, County Offaly, Ireland.*

    Our Filipino-Irish-American family will start our St. Patrick's Day celebration with a Filipino brunch featuring Filipino dishes that are comparable to the popular Irish dishes of sheperd's pie and hash. We'll enjoy a refreshing green drink and finish with a dessert of different colors resembling a rainbow - all of which reflect the celebration of St. Patrick's Day.

    Here is our St. Patrick's Day Brunch menu with links to the recipe for each entree.  Happy St. Patrick's Day!


    Saint. Patrick's Day Brunch

    Crisp golden pockets of ground beef, potatoes, carrots and peas slightly sweetened with sugar and raisins

    Fragrant and airy golden roll of bread speckled with fine bread crumbs

    Fried rice flavored with garlic

    Chunky corned beef and potatoes flavored with garlic and onions

    Steamed sweet rice cake in five layers of different colors and flavors

    A refreshing sweet blend of coconut milk, coconut flesh and gelatin served over ice

    Corned Beef Hash


    Corned beef hash is a popular dish for breakfast, lunch or dinner in the Philippines.  It is so quick and easy to make and is considered to be a comfort food.  The traditional corned beef hash is composed of canned corned beef and potatoes and flavored with garlic and onions.  Tomatoes are added at times.  The dish is a combination of both American and Spanish influences -- canned corned beef and sofrito, a basic sauce composed of garlic, onions and tomatoes.


    Corned Beef Hash


    Prep Time: 5 minutes
    Cooking Time:  15 minutes
    Yield:  4 servings

    Ingredients:

    • 2 tablespoons vegetable oil
    • 2 cloves of garlic, minced
    • 1 small yellow onion, chopped
    • 1 small Roma tomato, diced (optional)
    • 340 grams canned corned beef
    • 1 medium red potato, diced about 1/4 inch thick
    • salt and pepper to taste
    Procedure:
    1. Heat oil in a skillet over medium heat.  Saute garlic and onions for 2 minutes or until onion is translucent.
    2. Add tomatoes (if using.)  Cook for 2-3 minutes.
    3. Add the corned beef. Stir to mix.
    4. Add the potatoes.  Stir and cover.  Cook for 10 minutes.  Stir from time to time to avoid the bottom part from overcooking.
    5. Season with salt and pepper.
    6. Serve warm.